How to Activate License Online in 3DeVOK Studio (New UI version for v5005 and above)
Launch 3DeVOK Studio, and click the “Settings” icon in the upper-right corner.
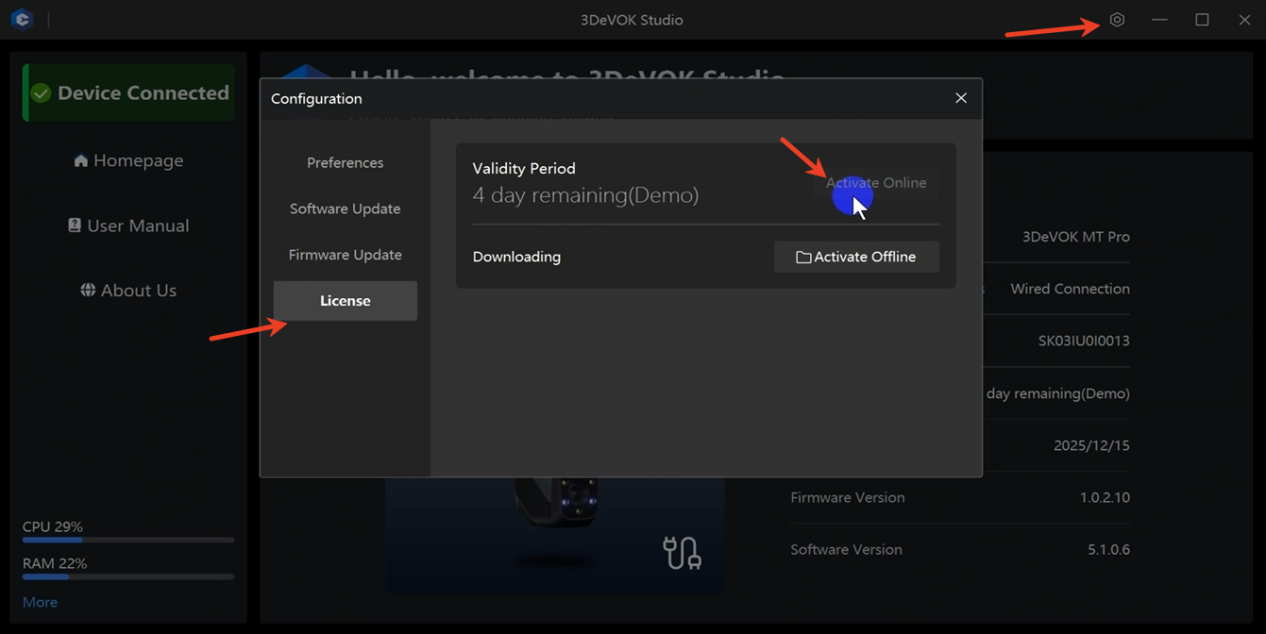
Click the “Settings” icon in the upper-right corner.
Click “License” > “Activate Online”.
When using 3DeVOK Mapping Software to fix textures, random UV split lines cause the areas that require Photoshop processing to not be fully displayed in the texture map. How can this be resolved?
You can repair one side of the UV split line first, then the other. After handling the UV boundaries, use the color blending function in Photoshop to create color transitions along the edges and eliminate seams. Alternatively, you can start with a full edit in Photoshop, and if issues persist, use Blender for additional touch-ups (please note: Blender’s texture editing tools only offer a stamping feature and may run with noticeable lag).
How can I wirelessly stream the real-time scanning display from the computer to my phone?
You can use third-party software to achieve this. In China, Tencent Meeting or Sunflower Voting can be used to connect your computer and mobile device. Overseas, you can opt for the combination of Sunshine (installed on the computer) and Moonlight (installed on the mobile device), or use Spacedesk software for connectivity.
What are the dimensions of the 3DeVOK MT waterproof case and the 3DeVOK MQ outer case?
The 3DeVOK MT waterproof case measures 358×284×168mm, and the 3DeVOK MQ outer case measures 280×260×108mm.
How many reflective markers are included in the 3DeVOK MT and 3DeVOK MQ scanner accessories?
The set includes 2000 pieces of 6mm reflective markers and 500 pieces of 3mm reflective markers.
How to get license in 3DeVOK Studio?
- Online Activation (Recommended)
– Ensure your computer is connected to the internet and the device is connected via cable.
– Open the software, navigate to *Configuration → Device Authorization → Online Activation**.
– Restart the software after activation to begin using it.

- Offline Activation (For unstable network or no internet access)
If online activation fails, follow these steps:
– Contact your sales to get the .RGF license file. Please check the file name and delete an redundant date suffixes, keeping only the serial numbers(SK**********).
– Connect the device, open the software, and go to”Configuration” “License”.
– Select Activate Offline and import the.RGF file.
– Click “Yes” when prompted, then restart the software to update data.

How to simplify a colored OBJ model in 3DeVOK Mapping Software?
– Import the model: Import the colored OBJ model into the software and select it in the interface.
– Start simplification: Click the “Mesh” menu in the toolbar and select the “Simplify” function.
– Set parameters: Adjust the simplification ratio as needed, then confirm by clicking “OK.”
– Save the result: After simplification is complete, the system will automatically generate a new model data. Select this data and click “Save” to export the simplified colored OBJ file.


How to Use the Aided Markers Alignment Mode?
– Mode Principle: This mode uses an infrared speckle light source and combines feature points with marker points to achieve stitching, effectively improving scanning stability in environments with insufficient features.
– Stitching Requirements: The scanner must recognize at least 1 marker point in each frame to maintain normal stitching. If stitching is lost, the scanner needs to see at least 2 marker points simultaneously to relocate and restore stitching.
– Marker Placement: Avoid placing two marker points on flat, featureless areas at the same time. It is recommended to place at least one marker point on a feature with distinct curvature or corners.
– Example Application: Infant Head Scanning
This mode is particularly suitable for scanning moving subjects, such as infant heads. Using assisted marker points can effectively counteract stitching loss caused by head movements, making the scanning process smoother. It is also recommended to enable the “Small Scanning Area” mode to limit the scanning range to the head area, avoiding capturing movements below the neck and further ensuring data quality.

What is distinction between Laser ClassⅠ and ClassⅡ ?
ClassⅠ Lasers are classified as inherently safe. Direct beam viewing, including with the use of optical aids, will not result in injury. Safety is achieved through engineering design and protective housing (for instance, a high-power laser source is fully contained, allowing only non-hazardous radiation leakage).
ClassⅡ Lasers are classified as conditionally safe. Their safety is dependent upon the natural aversive response (blink reflex) of the eye. While an inadvertent exposure is within safe limits, deliberate fixation on the beam presents a risk of retinal damage.
How to Import a Colored ASC Point Cloud into CloudCompare:
– Open CloudCompare and import your ASC file by either dragging it in or going to 【File】> 【Open】.
– In the pop-up “ASCII file import” dialog, you need to manually assign the color channels.
– Set columns 7, 8, and 9 as follows:
Column 7 → Red (float 0-1)
Column 8 → Green (float 0-1)
Column 9 → Blue (float 0-1)
– Click 【OK】 or 【Apply】 to import the colored point cloud.

How to Obtain Log or Crash Files for 3DeVOK Studio?
To assist in troubleshooting, please follow the steps below to locate and provide the necessary log or crash files.
-Locate the Software Directory
-Right-click on the software’s desktop icon and select “Open file location”.Find the Log Files
In the opened folder, look for a folder named “Log” or “Logs”. Please send the entire folder to the corresponding sales or technical support contact.
-Handle Crash Issues: If the software has crashed, look for a “Crash File” folder in the same software directory. Check inside for any files with the .dmp extension. If present, please provide these files as well.

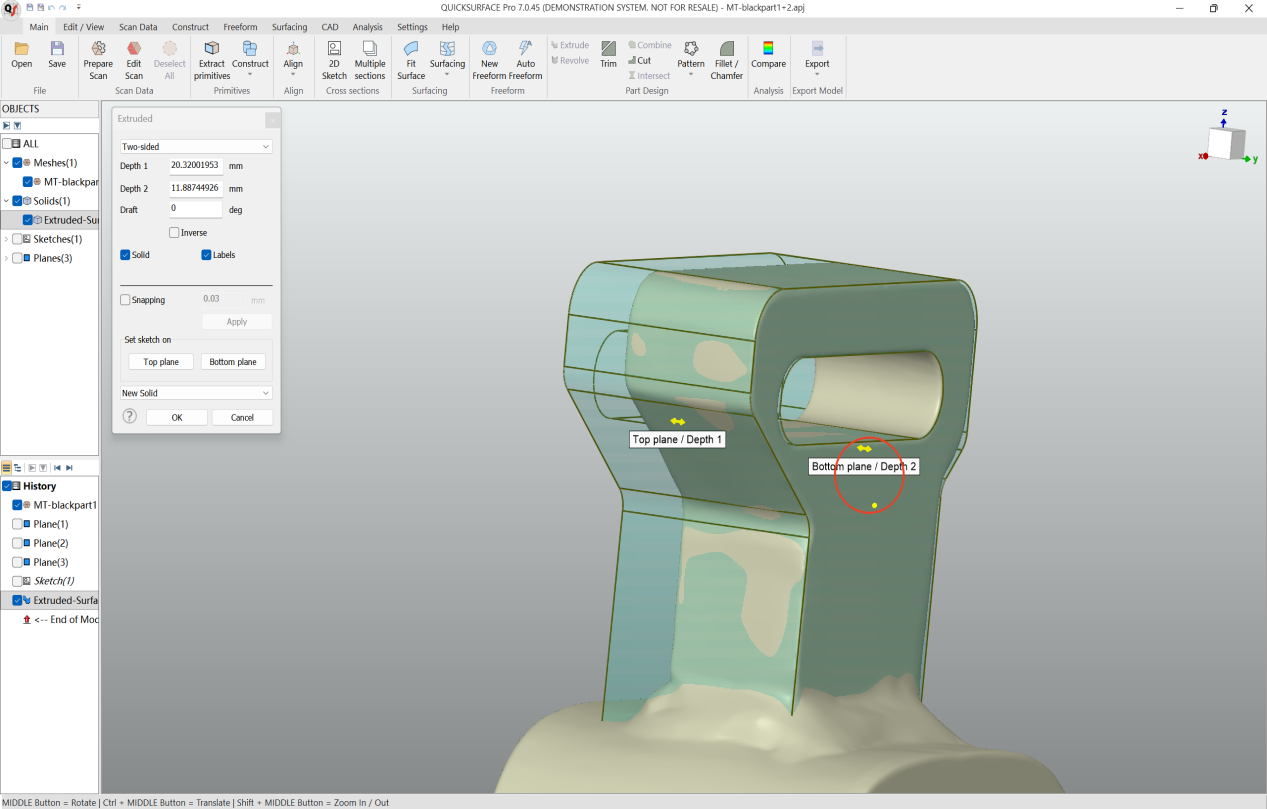
In QUICKSURFACE, what are the quick methods for extruding a 2D sketch?
Within the extrusion feature, first click and drag the yellow arrow on the top or bottom face to freely extrude the solid. While holding down the Ctrl key, move the cursor to the target plane you want to align with—the geometry will snap to it. The same method applies to both the top and bottom faces. Click OK to confirm and finish.