What is the purpose of saving project files?
After scanning, you can save scan project files, point cloud project files, and mesh project files for data archiving to prevent data loss and facilitate further processing later.
Saving a scan project file allows you to recalculate starting from the real-time scanning stage; saving a point cloud project file enables you to regenerate the mesh from the point cloud stage; saving a mesh project file lets you reapply texture directly from the mesh stage.


Why the scanner fails to recognize 3mm markers?
If the scanner cannot recognize 3mm markers, it is usually because the option has not been enabled. Please follow these steps:
– Click to enter the “More” settings menu in the software.
– Under “Marker”setting, check whether “3mm Markers” is enabled.
– If it is not enabled: Exit the settings, create a new scanning project, enable “3mm Markers” in the project settings, and then start scanning.
– If it is already enabled but still not recognized: Ensure that the markers are firmly attached, the surface is clean and non-reflective, and retry under good lighting conditions.

By saving the color point cloud as an ASC file, what information can we obtain?
When opening the ASC file with a text editor (e.g., Notepad), you can read three types of core data of the point cloud: three-dimensional spatial coordinates (x, y, z), normal vector parameters (i, j, k), and normalized color information (r, g, b).
In 3DeVOK Studio scanning software, what is the scan preview mode?
The scan preview mode is a real-time calibration step before scanning begins. After clicking “Start Scan” for the first time, the software enters this mode. The interface displays a live view and distance bar, allowing you to adjust to the optimal scanning distance based on the device type (Infrared: 300–400 mm; Blue Light: 210–300 mm). Once the distance is properly adjusted, click “Start Scan” again to exit the preview mode and begin recording 3D data. This feature is enabled by default and effectively improves the success rate of initial scans, which can be disabled in the settings menu.


What do the three parameters—”Memory,” “Disk Space,” and “VRAM”—at the bottom left of the 3DeVOK Studio scanning software represent?
Memory: determines the computer’s ability to run the scanner and process data. If insufficient, scanning fails: so expanding the virtual memory is necessary. Usage above 80% may cause software crashes: the project should be saved immediately.
Disk Space: defines data storage capacity. While it affects file saving, it is unrelated to operational speed.
Video Memory: governs real-time rendering and computing performance. If insufficient, issues such as display abnormalities, data loss, or crashes may arise. If usage exceeds 80%, the project should be saved immediately.

After opening the 3DeVOK Studio software, it can’t import the EPJ file (EPJ is a scanning project file). How can I resolve this?
Reason:
The device has not been connected, and the necessary KSET configuration file is missing.
Solution:
01. If there is a device available, simply connect the device, and the software will automatically activate and generate the configuration file.
02. If no device is available, you will need to manually import the KSET configuration file.
Follow these steps:
Copy the “KSET” folder from a USB drive / EPJ folder.
Right-click on the 3DeVOK Studio shortcut and select “Open file location.”

Go to the software’s root directory (D:\3DeVOK Studio\3DeVOK Studio).
Paste the “KSET” folder and ensure it contains the necessary configuration files
Restart the software, and you should be able to import the EPJ file successfully.

Why does the calibration freezes in 3DeVOK Studio?
- Potential Marker Interference:
The presence of extraneous marker points near the calibration board or its accessories can cause potential interference, which may stall the calibration process. Please remove any unrelated marker points from the vicinity.
- Incorrect Board Orientation & Cluttered Environment:
Ensure the calibration board is positioned in the correct orientation as indicated by the software. An incorrectly oriented board can cause calibration to stall.
Keep the area around the calibration board and its accessories clean and free of cluttered objects.
 The serial number of the calibration board does not match that of the scanner. For instructions on replacing the calibration board, please refer to the FAQ: How to calibrate the 3DeVOK scanner with a non-matching master plate?
 The serial number of the calibration board does not match that of the scanner. For instructions on replacing the calibration board, please refer to the FAQ: How to calibrate the 3DeVOK scanner with a non-matching master plate?
In 3DeVOK Studio, after processing scan data to Point Cloud, Mesh, or Texture , can I continue scanning?
Yes, you can continue scanning provided the object has not undergone any deformation. Simply left-click on “Real-time Scanning” within the “Data Processing” section of the left sidebar to switch to the scanning interface. Align the device with the object and click the start button on the touch screen to resume. The subsequent point cloud, mesh, and texture mapping will need to be processed after pausing the scan.

How to Activate License Online in 3DeVOK Studio (New UI version for v5005 and above)
Launch 3DeVOK Studio, and click the “Settings” icon in the upper-right corner.
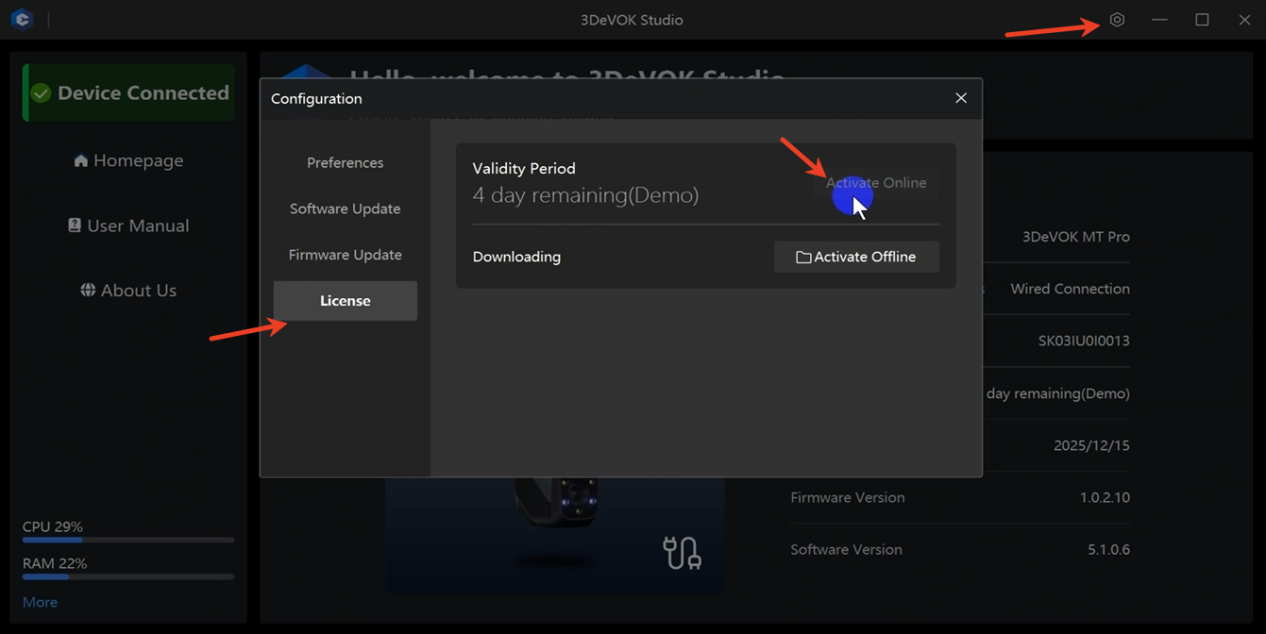
Click the “Settings” icon in the upper-right corner.
Click “License” > “Activate Online”.
How to get license in 3DeVOK Studio?
- Online Activation (Recommended)
– Ensure your computer is connected to the internet and the device is connected via cable.
– Open the software, navigate to *Configuration → Device Authorization → Online Activation**.
– Restart the software after activation to begin using it.

- Offline Activation (For unstable network or no internet access)
If online activation fails, follow these steps:
– Contact your sales to get the .RGF license file. Please check the file name and delete an redundant date suffixes, keeping only the serial numbers(SK**********).
– Connect the device, open the software, and go to”Configuration” “License”.
– Select Activate Offline and import the.RGF file.
– Click “Yes” when prompted, then restart the software to update data.

How to Import a Colored ASC Point Cloud into CloudCompare:
– Open CloudCompare and import your ASC file by either dragging it in or going to 【File】> 【Open】.
– In the pop-up “ASCII file import” dialog, you need to manually assign the color channels.
– Set columns 7, 8, and 9 as follows:
Column 7 → Red (float 0-1)
Column 8 → Green (float 0-1)
Column 9 → Blue (float 0-1)
– Click 【OK】 or 【Apply】 to import the colored point cloud.

How to Obtain Log or Crash Files for 3DeVOK Studio?
To assist in troubleshooting, please follow the steps below to locate and provide the necessary log or crash files.
-Locate the Software Directory
-Right-click on the software’s desktop icon and select “Open file location”.Find the Log Files
In the opened folder, look for a folder named “Log” or “Logs”. Please send the entire folder to the corresponding sales or technical support contact.
-Handle Crash Issues: If the software has crashed, look for a “Crash File” folder in the same software directory. Check inside for any files with the .dmp extension. If present, please provide these files as well.

