1. Ensure the plane of the reflective marker and each feature of the item being scanned are at a distance of no more than 25 mm. This will better guarantee the point cloud accuracy of the 3D reconstruction of the item’s features. Note: A single scan format can be recognized as a plane with no fewer than 4 reflective markers.
2. Try to ensure that the 3D scanner can recognize the reflective markers perpendicularly from each angle as far as possible. The more accurately the scanner identifies the center of the reflective marker, the higher the splicing accuracy will be. Therefore, place the reflective markers as dispersedly as possible across all dimensions and heights of the item being scanned. If the markers are only placed on a turntable, the scanning accuracy and data quality may be affected when the item’s height exceeds 25 mm.
3. Avoid placing reflective markers on curved surfaces. When the markers bend, they will appear elliptical to the camera, leading to inaccurate center calculation and reduced identification and splicing accuracy. If placing markers on curved surfaces is necessary, try to ensure the markers do not deform and gently adhere only the center of the marker to the curved surface.
How to choose appropriate scanning modes in 3DeVOK Studio scanning software?
For objects scanned with 3DeVOK MT/MQ, the primary classifications and suggested scanning modes are listed below:
- Matte/textured/multi-colored objects:Laser Scan – Hybrid Alignment / Infrared Structured Light Scan
- Large-scale objects(>30cm): Infrared Structured Light Scan / Marker Alignment
- Human:Human Mode / Lightless Scan
- Glossy black/reflective/detailed components:Laser Scan – Marker Alignment
- Small parts(5-10cm): Laser Scan – Marker Alignment
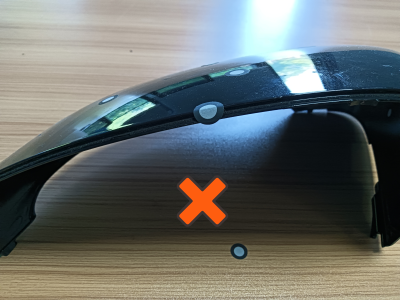
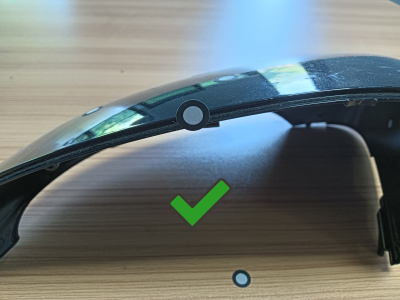
After finishing the scanning of markers, why does the scanner continue to capture marker points rather than scanning the object?
After scanning the markers, click Finish in the software or long press the button on the touchscreen and wait for the green progress circle to complete one full rotation. Release your finger when it turns into a green √ (as shown in the image below) to finish scanning markers. Then click “Start” to scan the object.

What should be noticed when sticking markers?
- Markerplacement: When sticking markers, each marker should be positioned more than 3mm away from the edges or features to ensure the hole-filling algorithm works properly. Otherwise, the marker area may not be filled correctly, affecting the quality of the edge data.
- Distance between markers: The distance between any two points should not exceed 10-12 cm, with 6-8 cm being recommended.
- Marker position: Markers should be stuck on a flat surfaceinstead of a corner or a
For reflective objects with few features, how to handle the issue of Assist Patterned Pad reflecting onto the object during photography?
You can print the Assist Patterned Pad provided on the official website, cut it into the shape shown below according to the real size of object. Then place it on the turntable for photography.
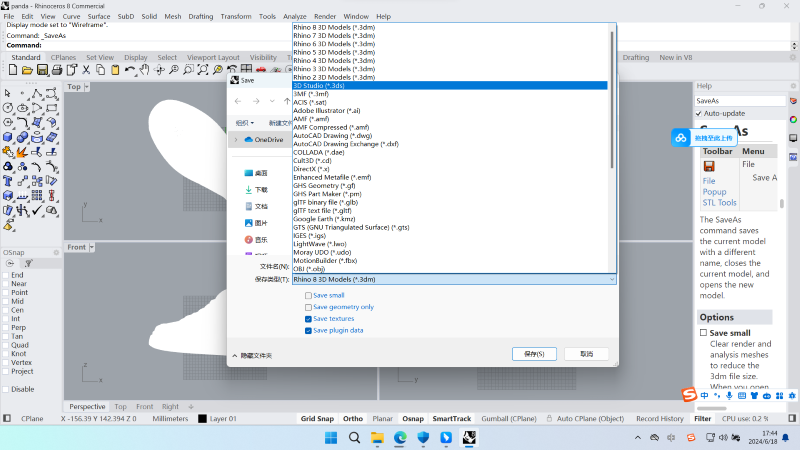
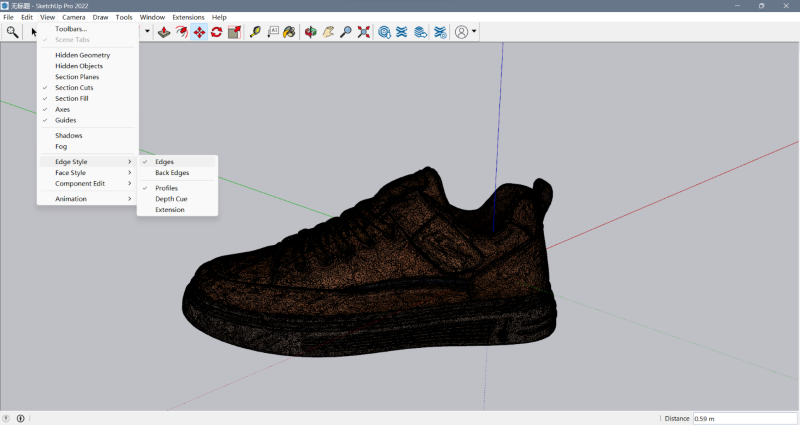
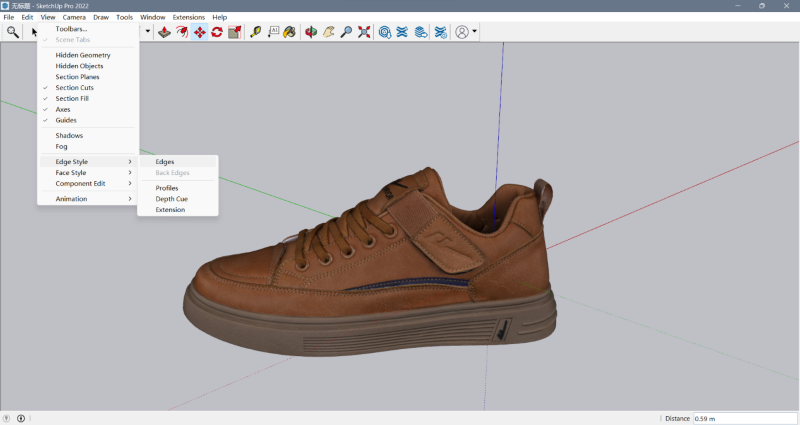
How can an obj file obtained from an 3DeVOK Studio Scanning Software be imported into SketchUp (SU) software and opened?
Color 3D models exported from 3DeVOK Studio scanning software usually consist of obj (mesh), mtl (material), and jpg (texture) files. The obj file can be imported into 3D software (e.g., Rhinoceros), saved as a *.3ds format, and then exported.
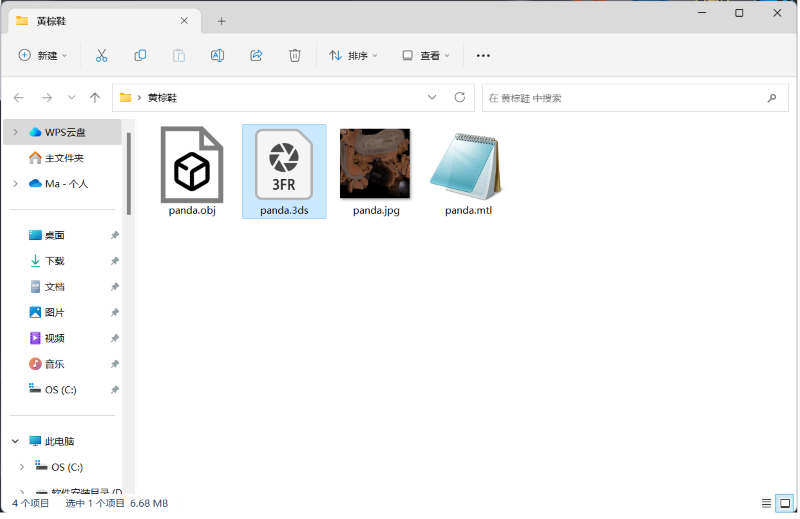
Next, import the *.3ds file into SU.
To hide the edge lines in the imported file, click View – Edge Style – Edges and uncheck the box.
How to improve 3D scanning accuracy in reflective marker splicing mode (Landmark)?
5. An appropriate 3D scanning distance is also conducive to improving accuracy. In the optimal scanning distance range, scan a little farther away, which can recognize more reflective markers, thus improving the accuracy.
6. Diffuse reflective surfaces help ensure the quality of the 3D reconstruction point cloud. The reflection/refraction of laser/scattering on the object’s surface can increase reconstruction errors. For example, the reconstructed sphere diameter of a translucent sphere may be smaller than the original one. Therefore, for highly reflective, specular, transparent, translucent, black and challenging surfaces, applying a contrast enhancer can help ensure the quality of the 3D point cloud reconstruction.
Summary of Precautions for Pasting reflective markers:
1. The more irregular the reflective marker, the higher the accuracy.
2. Reflective markers should be scattered and placed on all directions and heights of the items to be scanned.
3. The distance between two reflective markers should be 4-8 cm for optimal accuracy.
4. The distance between the plane of the reflective marker and each feature of the item being scanned should be no more than 25 mm.
5. Reflective markers should not be placed on important geometric features or edges to prevent data loss. Instead, place them on large surfaces/planes whenever possible.
Note: If the 3D scanning accuracy requirement is not stringent, the above guidelines can be followed selectively.
After the data is saved, re-open the file in the 3DeVOK Studio software, the next step cannot be processed.
- Check whether the datanumber in the DataImage folder where the scanning project is saved is continuous. If there are intermittent numbers, the data cannot be processed normally.
- At the same time, check whether there are files of 0 kb in the folder. Those files will also affect the normal processing of data.
- Check the performance of the CPU and GPU of the computer and check if the disk space of the computer is sufficient, you can quickly check them from the diagnosis function of the software.
What is the maximum distance between two markers?
To ensure a better result, it is recommended that the distance between two markers should not exceed 8-10 cm.
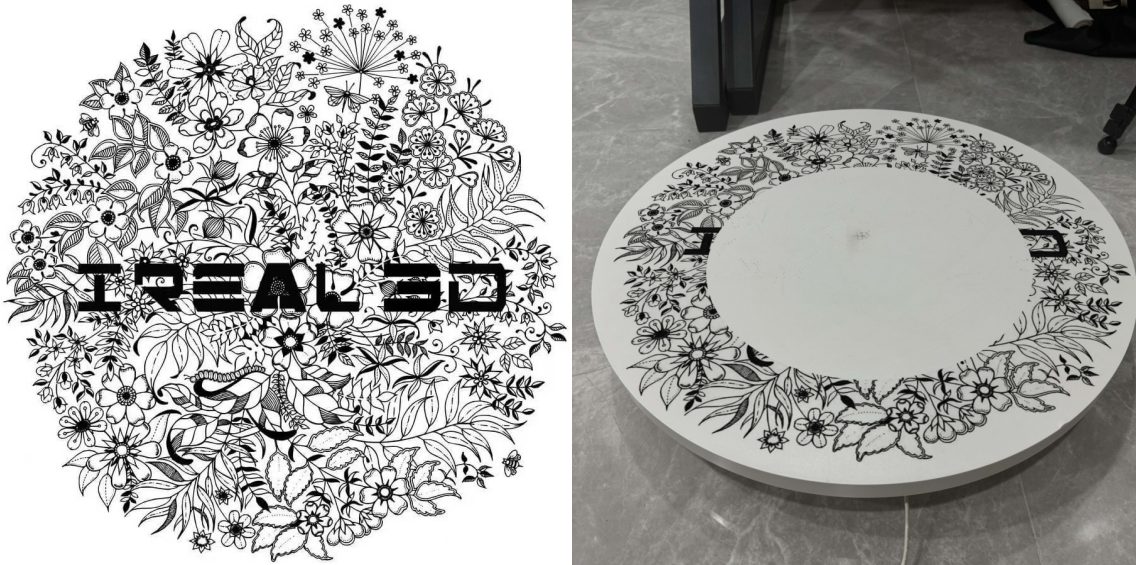
What kinds of items are iReal 2E’s color scanning best suited for?
Items that meet the following three conditions at the same time have the best scanning results of colors and textures:
- Matte, rich color, non-solid color, less black items;
- Items with continuous, non-repetitive, and richly varied geometric features (features alignment)/texture features (texture alignment);
- The size of the item is ≥30cm (iReal color camera has 1.3 million pixels, and the best scanning distance: 40 cm. The mapping result obtained by this pixel at this distance has limited clarity. If the item is too small, it may not be able to satisfy its mapping quality requirements).
What size item is the iReal 2E best suited for scanning?
The best scanning size is 0.3 – 4.0 m.
- The maximum size of a single scan: it is recommended not to exceed 4 m. If the size of the item is too large or the resolution setting is too small, the amount of single data can be too large, you can scan it in sections, and then start the alignment in 3DeVOK Studio software or in third-party software (if the amount of data is too large, you need to reduce the surface before alignment).
- It is recommended that the minimum scan size be no less than 0.3 m. The basic accuracy of iReal 2E is 0.1 mm, and the minimum point spacing is 0.2 mm. This accuracy and point spacing determine that when the size of the item is less than 0.3 m, the local details/textures/angles of the item may not meet the customer’s data restoration needs.
The above suggestions are for reference only. Specific operation methods can be adjusted based on the actual tests: whether iReal 2E can meet your data restoration needs.
Is iReal 2E 3D scanner perfect for portrait scanning?
- iReal 2E performs targeted optimization on portrait/human body scanning: it supports non-light 3D scanning, hair scanning and dark environment scanning. In addition, because the human body is relatively flexible, it is inevitable that we tend to move a little bit involuntarily during the scanning process, which will lead to multiple sets of data in the same part. With a common algorithm, staggered layers will occur even successfully aligned. However, according to the innovative algorithm of iReal 3D, the multiple sets of data caused by a slight movement of humans can be automatically removed, and registered together as a result, which, has greatly reduced the cost of future data recovery.
- iReal 2E is especially suitable for scanning busts, full-body portraits, and parts of the human body (for shape fitting design), etc. It can be used for artistic portrait customization and re-creation (bronze portraits, 3D printed portraits, sculpture portraits scene reproduction, body art, etc.), film/game/VR, AR and other CG character modeling, medical rehabilitation (spinal orthosis, cervical brace, prosthesis, arm immobilizer, orthopedic helmet, etc.) and human body part customization.
Under what conditions can the iReal 2E 3D scanner work without markers?
- When the scanned object has continuous, diverse and rich geometric and texture features, you can 3D scan it without markers, which greatly improves the on-site work efficiency;
- When the geometric and texture features of the scanned object are not that rich, you can use the mixed alignment mode, which requires fewer markers to conduct the 3D scanning;
- When the geometric and texture features of the scanned object are repeated or relatively fewer, such as large plain item, large curve item, or long and narrow item, you can use the markers scanning mode to ensure a smooth scanning experience, and its accuracy would be higher (up to 0.3 mm/m).
